8.20.2013

Cooking From the Garden: Pickled Striped Beets


Striped beets aren't usually as sweet as regular beets, so they tend to get overlooked when we harvest things from our garden.  Jake continues to grow them because he thinks they are pretty, but the result tends to be what I refer to as "monster beets."  Sometimes, we will have left them in the ground so long a couple of them grow together into one beet. 
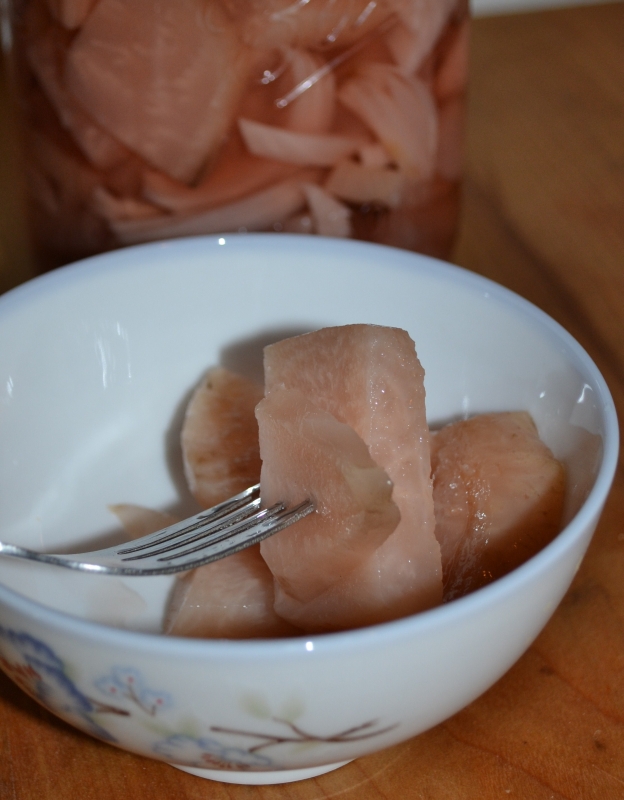
At that point, they are a little bit tough, and the flavor leaves something to be desired.  But it is easy to punch up that flavor by roasting the beets, then pickling them.  The stripes present in the raw beets fade over time, leaving a pale pink pickle this goes beautiful in a salad or as an accent to a meal.
 
We made these earlier in the summer.  I've been holding onto these pics until I opened a jar so I could show you the finished product at the same time.  You can use the following recipe with red beets, but the color will be much darker.
 

8 - 10 c. striped beets, cleaned and peeled
3 tbsp. fresh rosemary needles
2 tsp. olive oil
1 large red onion, frenched
1 c. white wine vinegar
2 tsp. sea salt
1/2 c. sugar
1 c. water

Preheat oven to 400 degrees F.  Prepare a canning bath. 

Cut the beets into small chunks and place them on a baking sheet.  Sprinkle the rosemary over the beets and sprinkle with the olive oil.  Roast in the oven for 35 minutes, or until the beets are completely completely cooked through.
 
Remove any tough spots from the cooked beets.  Layer together with the onion in 1-quart jars.  In a small non-reactive pot, combine the vinegar, sea salt, sugar and water.  Bring the liquid just to a boil, then pour it over the beets in the jars.

In a small pot boil the rest of the ingredients and pour over the beets, leaving proper head space. Process for 30-35 minutes.


7.27.2013

Minions Cake Pops

I've been getting ready to do a kid's cooking class again next week, so I've been in full-tilt baking mode.  Check out my take on the Minion Cake Pop.  They're not that hard to make.   

To make about a dozen pops: 
Start with a basic vanilla cake (1 box of cake mix, or a recipe that will make an 11x13 cake).  Crumble it and add around 5 tablespoons of vanilla frosting (depending on how moist your cake is).  Form the resulting "mush" into egg-shaped balls.  I like to put mine in the freezer for about an hour to let them firm up.


While this is happening, melt:
1 package yellow candy melts
1/3 package blue candy melts
1/4 package chocolate chips.


Roll out:
6 small Tootsie Rolls (square up edges and cut each into two straps)
1 small block blue fondant (cut into 6"x1 1/4" strips)


For each pop you will also need:
1 stick
4 pieces from a candy necklace (2 white, 2 another color)
2-8 chocolate sprinkles
Black food-color marker

Dip the stick into the yellow candy, then push it into the cake pop, being careful it doesn't come out the other top.  Allow it to set for a minute or two, then dip the pop, tilting to cover all the cake.  Before it dries, add the 2 white round candies for goggles and wrap a strip of tootsie roll around it to for the strap (some of the characters can have one eye).  Place the sprinkles lengthwise atop the cake pop to make hair.  Wrap the strip of blue fondant around the bottom of the pop, pressing it well into the still-wet candy coating to make it stick.  Use a toothpick dipped into the melted chocolate chips to add eyes to the center of the candy goggles.  Use a toothpick dipped into the blue candy melts to adhere the other two round candies near the bottom of the cake pop to make feet.  Ust the food-color marker to draw on a mouth and a circle with a "G" in it.

4.17.2013

It Takes the Cake: Strawberry Filled Chocolate Cake

I'm down to my last jar of strawberry lavender preserves.  This means two things:

1 -- I made just enough preserves last spring to last for the year, as strawberry season is right around the corner, and

2-- I need to come up with something special to do with this last bit of sweet perfection.

So I whipped up a rich chocolate cake, substituting lavender sugar for the granulated sugar, along with a batch of chocolate buttercream.  When I assembled the cake, I spread a layer of the strawberry lavender preserves in the middle.


I piped a simple strawberry design on the top, and did a bright green beaded boarder at the edge of the cake board.


If you'd like to make your own strawberry lavender preserves, here's my recipe:

Strawberry Lavender Preserves:

8 c. strawberries
4 c. lavender-scented sugar (or granulated sugar)
2 tbsp. lavender flowers
Juice of 1 lemon

Wash and hull strawberries and slice using an egg slicer. Combine the strawberries and the lavender sugar in a large pot and heat slowly until the juices become clear (4-6 minutes). Remove from the heat and stir in lemon juice.  Bundle the lavender flowers into a square of cheesecloth and tie securely.  Add the bundle to the strawberry mixture.  Cover the pot loosely with plastic wrap let stand overnight.  When you are ready to proceed, heat 2 or 3 ladles full of the strawberry mixture in a 10-inch nonstick skillet over medium-high heat. Cook and stir for 3 -5 minutes, or until the preserves pass one of the tests for reaching the gel state.

Ladle the jam into the sterilized jars, filling to within 1/4 inch of the rim. Repeat with the remaining strawberry mixture.  Process in boiling water canner for 5 minutes.

If you want wore information on canning and are local to the Dallas Fort Worth Area, there is still pelnty of time to sign up for my Fundamentals of Canning class that I will be teaching out at The Universtiy of Texas at Arlington in early June.
  

4.03.2013

It Takes the Cake: Vintage Cake Presses

I love thrift stores.  You never know what you are going to find.  One of the stores I frequent often puts collections of similar items together in plastic bags.  I picked up a bag the other day, and I thought it had cookie cutters in it.  But I could see the word "Wilton" and the copyright date "1972" on the back of one, and since the bag was only $2, I bought it.

There were cookie cutters in there: four Barney ones, to be precise.  (As I don't have any toddlers in the house, those will be going up on Ebay, when I get a chance).

But the Wilton things weren't cookie cutters.  I wasn't sure what they were, but I had a guess, and when I put in the model number (408-91) on the back into Google, my guess was confirmed.  I had picked up an entire set of vintage cake presses. 

Cake presses are neat, and couldn't be simpler to use.  Once you have a base coat of frosting on your cake, you gently press the design onto the cake, creating an outline pattern, which you then trace over with thicker decorative frosting.  You can use one design in the center of a round cake, four of the same design in the corners of a larger rectangular cake, or a repeating / alternating pattern around the side of a tall cake.  Or use your imagination . . .

These can also be used to press a design into fondant, uncooked sugar cookies, royal icing, etc.

I was planning to visit an elderly friend, so I decided to make her a cake and use one of the presses to make a design surrounding her last initial. 

3.24.2013

Fort Worth Botanic Garden -- Spring Has Sprung

A couple of days ago, were out at the Fort Worth Botanic Garden taking pictures of new-to-me vintage brooches to go up on my Etsy site.  While we were there, I took some shots of the beautifully intense spring colors.  Enjoy.

These two shots are of pansies.  A humble choice for sprucing up the garden, but look at the effect of a mass planting, and the beauty of a single plant in closeup.


And who could expect such brilliant intense beauty from any other vegetable aside from Swiss Chard?

What could be more of an acknowledgement of spring than a fern unrolling new growth?

And here's a bonus: Two shots of a squirrel who was likewise out enjoying the good weather. 

3.22.2013

Making a Fascinator from a Vintage Brooch

fascinator
I'm fascinated with fascinators.  They can be oversized or subtle, dramatic or elegant, worn as part of a hat or a viel, or fastned directly to your hair.

I'm also in love with vintage brooches (if you don't know that by now, you obviously haven't taken a look at my Etsy shop, where I sell the overflow of my collection).

So when I got invited to a formal, I decided to make a feather fascinator starring a vintage bird brooch.  I love the way the bird's wings arc back, so I wanted to make the feathers look like an extension of the wings.  I also tried to echo the oversize crimson rhinestones by adding a few red feathers to the shimmering green ones.

Whatever brooch you use, whether a bird or something geometric, making a feathery fascinator couldn't be easier.  You can make one too.

1 Beak-clip hair finding
floral or jewelry wire
12-14 (6") feathers (I used black / green sheen ones that were already bundled together in threes)
4 - 6  (2") feathers (I used dark red)
1 vintage brooch

Place the brooch on top of the clip and arrange the feathers so that they line up with the design elements of the brooch. Carefully slide the clip out from under, leaving the feathers in place on the table.

Wrap one end of the wire around the inside edge of the beak clip to secure it.  Pull out the leftmost feather (or feather bundle), and wrap it onto the top of the clip, bringing the wire back up through the center of the clip.  Repeat with the remaining feathers.  Then simply clasp the brooch onto the piece (for a more permanent result, you can glue the brooch in place if you don't mind damaging it).

3.20.2013

It Takes The Cake: Two Peas in a Pod Cupcakes

A friend of mine just had a baby shower, and decided to have a dessert bar.  She's having twins, and the shower theme was, "Two Peas in a Pod."  I was asked to make a batch of cupcakes, and I had a vague recollection of seeing a cupcake design with a fondant pea on it.  I decided to make my own version of this, frosting half of the cupcakes with a mound of pink buttercream and adorning each with a single pea, then frosting the other half with a layer of white buttercream and stylized pea flowers. (No, they aren't botanically correct, but I was going for quick and cute.


The fondant peas were easy to make.  You just roll it out, then cut leaf shapes with a butter knife.  Hold the shape in your palm and place two candies (I used Sixlets, but green Skittles would work just as well.  Fold the leaf in half and press it gently together, leaving part of the edge open so you can see the front part of the candies.


3.18.2013

Green Curry Chicken

Thai couisine is one of my favorite styles to cook in.  The flavors are bright, the meals come together quickly, and they don't take a lot of specialized equipment.  I grow my own basil, and Jake has a little kafir lime tree (he's into all things citrus -- you can see his lime tree on his citrus blog), so we find that this is a great dish to show off our garden efforts.  Green curry at restaurants always seems a little to "soupy" to me, so this recipe uses only one can of coconut milk. Enjoy!


Green Curry Chicken


1 tablespoon vegetable oil
3 tbsp. Thai green curry paste (less, of you don't like your curry spicy)
1 medium onion, thinly sliced
1 red bell pepper, sliced
1 14-ounce can coconut milk
2 teaspoons fish sauce (or soy sauce)
1 ½  pound boneless chicken breast, sliced *
1 tsp. salt
1 tsp. white pepper
2 kefir lime leaves, minced
Handful fresh basil, minced
Juice of one lime

Heat oil in heavy skillet over medium-high heat. Add curry paste and stir-fry for about a minute, until the paste starts to become fragrant.  Add the onions and bell pepper and cook until they soften (2-3 minutes). 


Pour in coconut milk and fish sauce.  Allow the mixture to come to a boil, then add chicken.  Cook, stirring frequently, until the chicken is completely cooked.
 
Stir in basil, lime leaves and  lime juice.; bring to boil. Add chicken and bell pepper; stir until chicken is just cooked through. Add salt, pepper, lime leaves, basil, and lime juice.  Serve with jasmine rice. 

* I find that chicken is easier to slice if you cut it when it is still partially frozen

2.13.2013

Local Foodie: Rhonda Reis

I got a chance today to sit down with Rhonda Reis, co-owner (with her husband, Steve), of Bella Vita Gourmet Olive Oil & Balsamics.  The storefront is a beautiful, airy place, with gleaming silver fustis (seamless vessels that hold the oils and vinegars, to protect them from light) lined up in rows.  The smell of the balsamics hits you as you open the door, a little sweet, a little acidic, but guaranteed to make you hungry.  Here’s what Rhonda had to say.
Q. What got you interested in oils and vinegars?
A. I had started doing wine dinners for friends and others who booked me back when I was living in Tucson, and I got a hostess gift of balsamic and oil from a friend.  (I asked Rhonda if she remember what varieties, and she did: Blenhaim Apricot White Balsamic and Lemon Infused Olive Oil)  This sparked a passion, which we eventually turned into a business.  We moved from Tucson to Dallas in August and just opened Bella Vita at the Highlands in late November.
Q. I know one of the highlights of your store is that you do custom pairings of oil and vinegar based on each customer’s tastes.  What is your personal favorite pairing?
A. The answer to that question changes every day.  At the moment, I’d say Blackberry Ginger Balsamic with Orange Fused Oil.  Fused oils tend to have more flavor than ones labeled “infused.”  To fuse an oil, the ingredients actually spend time in a centrifuge, and after the solids are removed, much more of the juice and plant oils remain.

Q. What is the first thing someone should look for when choosing an olive oil?
A.  Look for a crush date on the container, along with a notation on where the oil is from.  These two pieces of information can help you make sure you are not wasting money on an inferior product (or a really old one – some time as much as 5 years).  In fact, when you shop for oil at a grocery store, you may not be getting 100 percent olive oil at all.  Sometimes distributors use cheaper oils – such as canola or soybean oil as a “carrier” oil.  Most “light” olive oils have a very low percent of actual olive oil.  In a real olive oil, you should be able to smell a strong fragrance of fresh olives.  The company we buy from tests every batch to ensure it is 100% olive oil.
Q.  What about choosing a vinegar?
A.  Fruit flavors are often created in the laboratory.  Look for vinegars that don’t list chemicals in the ingredient list.  This can be a real problem in people with allergies.  Also look for vinegars that don’t rely on sugar to boost the flavor.
Q. What should people know about Bella Vita?
A. Our main clientele are people on special diets, from weight reducing to gluten free.  Our products do not include added sulfites.  They are also all gluten free and safe for people with allergies to soy, eggs, dairy, peanuts.  With the exception of nut oils (which are produced using separate equipment) they are also safe for people with tree nut allergies.  There is never any added sugar.  Because the oils are so fresh and intensely flavored, you need to use very little.  You wind up ingesting fewer calories while still having beautiful tasting food.  Except for the sample bottles, all the bottles you see are empty.  We store our oils and balsamics in the fustis to keep them at thier best quality, and pour them into the bottles for each customer.
Thanks again to Rhonda for taking the time to tell us about Bella Vita.  To learn more, visit her web site www.bvoliveoil.com.  Rhonda trained as a pastry chef, and now makes fresh baguettes at the store every Thursday – Saturday. If you want one, it is best to order in advance, as they sell out quickly.  Rhonda also does cooking classes.  This month’s classes – which feature such delicious-sounding options as Chocolate Balsamic Strawberry Trifle -- are booked solid, but keep an eye on the web site for future offerings.

1.08.2013

Key Lime Pie

When you think of key limes, your mind probably automatically goes straight to pie.  But there are so many other uses for this versatile citrus.  Of course you can use it for other baked goods – think butter cookies, cheesecake, muffins, etc.  Grown in both Florida and Mexico, it is the most authentic lime to use for Mexican-inspired soups (you can give a nod to Florida by using it in fish preparations).  Key limes also make great additions to marinades and sauces.  As a bonus, they make for a super-tangy limeade.
But when I brought in the groceries, and the hubby noticed the bag of key limes that I had bought in a super-cheap sale, he said, “Ooooh.  Pie.”  So I’m posting my favorite key lime pie recipe.  I like to keep it simple, without meringue or what have you on top.  And it is just as easy to make two of them at a time.  In our house, the second one gets sliced and the slices set on a tray in the freezer.  Once they are frozen, I place individual slices in zipper bags so I don’t have to thaw the whole thing.
Key Lime Pie (makes 2 pies)
16 graham crackers (full sheets)
6 tbsp. sugar
 ½ c. melted butter
8 large or extra large egg yolks
2 (14 oz.) cans sweetened condensed milk
1 c. fresh key lime juice
2 tbsp. key lime zest
 Preheat oven to 350 degrees.  In a large mixing bowl, crush the graham crackers. 
Add the sugar and melted butter and mix until well combined.  Divide graham crumb mixture in half, and press each half into a pie plate.  Place pie plates in oven and bake until browned, about ten minutes.  Transfer to a rack and allow to cool while you prepare the filling.  Beat the egg yolks on high speed until they thicken and turn pale.  Add the sweetened condensed milk and beat to combine. 
Add the lime juice and zest.  Reduce the mixer speed to low and beat until well combined. 
Pour half of the mixture into each pie shell and bake for 12 minutes.  Allow to cool on a rack for at least half an hour, then chill completely in the refrigerator before serving.

1.01.2013

Quiche Me, Quick

Quiche is one of those flexable "everything but the kitchen sink" dishes that you can make with whatever you have on hand.  Keep the proportion of eggs to milk/cream/half-n-half/ yogurt the same (roughly 4 eggs to 1 1/2 c. dairy), and you can add cheese, meat, veggies, etc. to your heart's content.  If you add too much, just divide the mixture in half and make two quiches.

We glazed a spiral sliced ham earlier this week, and made steamed broccoli florets, so this particular quiche is a perfect exmple of how to use leftovers.  When I teach my cooking classes, I  have a hard time convincing students that the stalk portion of broocoli is not only edible, but delicious, especially in cassaroles, pot pies and quiches, where the florets might be distracting to the overall texture of the dish.

I wanted this to be a relatively quick breakfast dish, so I cheated a little and used a packaged pie crust.  Can it get any easier? 

Ham and Broccoli Quiche

2 tbsp. olive oil
1/2 c. onion, diced
1/2 c. broccoli stalk, diced
prepared pie crust
4 eggs
1 1/2 c. milk
1 tsp. salt
1 tsp. pepper
1 c. mozzarella cheese, shredded
1 c. ham, diced

Preheat oven to 400 degrees F. Heat olive oil over medium high heat in a heavy skillet. 
Add onion and broccoli stalk.  Sautee these vegetables until the onion turns translucent and the broccoli softens.  Set aside to cool.  Roll out pie crust into a 9" pie plate, and prick the bottom of the crust with a fork. 

In a large bowl, scramble eggs.  Add milk, salt, pepper, cheese, ham and cooked vegetables. 
Combine well and pour this mixture into pie crust.  Bake for 40-50 minutes, or until firm.  Let cool for fifteen minutes before cutting.